Twitter Bots
We’re going to create a simple Twitter bot that tweets automatically from a pre-written list of tweets. You don’t need to do any computer programming to get this to work, but there are some persnickety parts where you’ll need to follow instructions precisely. Some of the vocabulary will be a little strange—we’ll be talking about “keys” and “secrets” and “callbacks”—but don’t get too wrapped up in the terminology. You’re going to great! I know it.
Static Twitter Bots
The method we’re going to use to set up a Twitter bot uses Google Apps to store the text of the tweets you want to send and to automatically schedule tweets. This is great, because it’s free and (relatively) easy to set up. The main shortcoming of this method is that it can only make one kind of Twitter bot: the kind that just tweets from a pre-determined list. There’s no functionality here to (e.g.) respond to particular tweets, or to generate tweets on-the-fly in response to some external stimulus. For many purposes, the static approach is sufficient. If you need help getting started on a bot that does something more sophisticated, let me know!
What we’re doing here
At this point, you’ve probably scrolled down this page and seen just how complicated all of these instructions are. “Why is it so difficult to set up something as simple as a Twitter bot?” you say. It’s a fair question! There are a number of steps you have to undertake in order to be able to use the Twitter API (“application programming interface”) at all, for any purpose.
The reason for this, as I see it, is that Twitter (as an organization) walks a fine line: they want artists and programmers to be able to create useful utilities that work with their service, but they don’t want to make life easier spammers or other abusive agents. (They also don’t want anyone to cut into their advertising revenue, which is neither here nor there…) So when you’re going through the steps below, and inevitably messing up a bit (and then stoically recovering from messing up, naturally), just remember that the same difficulties you’re having are the difficulties that every potential Twitter spammer (or phisher, or anyone else engaged in blackhat hacking) faces.
In brief, the steps below are intended to accomplish the following:
- Set up a distinct user for your bot.
- Give that user credentials for accessing Twitter programmatically. For security reasons, you can’t just use a password to post tweets programmatically; you have to use funny things called “OAuth tokens.” These tokens can only be issued in the context of a Twitter “application.” (“Application” is just a word for “a virtual entity that issues credentials”—we’re not making an iPhone app here or anything.)
- Give the user something to Tweet. (This goes in a Google spreadsheet.)
- Tell the Google servers to automatically tweet your data on a schedule. (This process is all managed by scripts that I’ve written, but there’s a tiny bit of setup work that you’ll need to do to get it all squared away.)
Steps
So let’s get started! Below you’ll find a list of steps in detail. The Google spreadsheet you’ll copy in step one also has an abbeviated version of these instructions.
Before you proceed, you’ll need a Google account (with access to Google Drive) in order to complete this tutorial. Log into your Google account and follow the steps below.
1. Create a copy of the “Iterative Twitter Bot” spreadsheet.
Click on this
link. This spreadsheet is the “master version” of the spreadsheet, which
only I can modify. You’ll need to make your own copy! To do this, go to File > Make a copy.... Choose a name that will remind you later what you intend to do
with the spreadsheet (e.g., something like “Iterative Twitter Bot for Fun Sandwich Names”).
If you want to make a second Twitter bot, just make a second copy of the spreadsheet.
2. Populate your spreadsheet with Tweets
The “Iterative Twitter Bot” spreadsheet has two sheets: “Setup” and “Tweets.” You can switch between the two using the tabs at the bottom of the screen, like so:

Switch to the “Tweets” sheet. This sheet contains a list of Tweets that your bot should send—one tweet per row (with the tweet text in the first column of the row). The sheet comes pre-populated with a Shakespeare sonnet. You’re going to want to delete the sonnet and then paste in your own tweets. The easiest way to do this is to compose your tweets in a text editor, with one tweet per line. Then select all of the cells in the sheet, press “Delete” (or Backspace) and paste in the tweets from your text file. It will look something like this:
3. Get the Project Key
You’ll need a special value called a “Project Key” in order to get your Twitter bot to work. (This is a value required by Google so that Google and external services like Twitter can talk to each other.) Getting the project key is a bit tricky. You need to follow these steps:
- Switch to the “Setup” sheet.
- In the menu bar, select
Tools > Script Editor.... A new browser tab will open. - In the new browser tab, select
File > Project properties.... Select the value labelled “Project Key” and copy it to your clipboard. - Close this tab. Paste the value you just copied into the cell next to “Project Key” in the Setup sheet.
The whole process looks like this:
The “project key” in the animation above is not the same as the one you’ll see. You’ll have something that looks similar—a bunch of random letters and numbers—but is actually different, if you look closely.
Don’t worry about anything else you see in the Script Editor window—that’s all behind-the-curtains stuff. Your only goal in the Script Editor window is to get the Project Key. After that, you never need to open that window again. (Unless you want to investigate how the Twitter bot works!)
I’m having a problem!
If something weird happened and you didn’t see exactly what happened in the above animation, something may have gone wrong. Perform the following steps to troubleshoot.
- First, make sure you’re working on a copy of the spreadsheet, not the original. If you’re looking at the original, the “Script Editor” menu item will be grayed out.
- Try reloading the page. (For some reason, some script-related events don’t fire off right after you copy a spreadsheet; reloading the page should clear up this problem.)
4. Create a Twitter application
At this point, you need to create a Twitter application. This is easier than it seems at first. Go to this page and log in to your Twitter account. (You do have a Twitter account, right? If you don’t, sign up for Twitter real quick and then come back here when you’re done.) Click on the “Create a new app” button in the upper right-hand part of the screen.
You’ll see a form that looks like this:
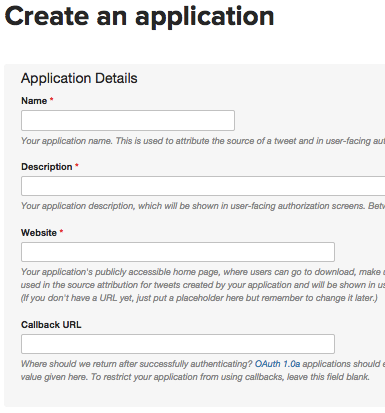
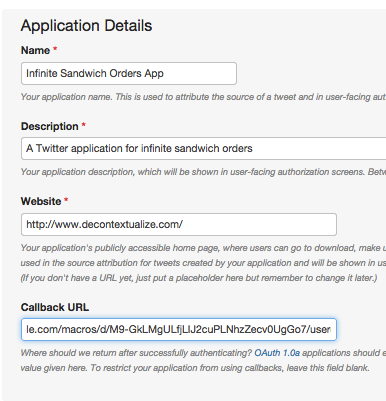
Fill out this form. The values you use for the “name,” “description” and “website” fields aren’t important; no one will ever see these except for you (and maybe someone at Twitter if someone complains about your bot). The “name” field needs to be globally unique, so put in something distinctive. (“Test app” isn’t going to cut it.)
The only tricky field is “Callback URL.” This needs to be a very particular URL
that is associated with your Google Apps spreadsheet. To get the value to put
in this field, go back to your spreadsheet and select Bot > Get Callback URL
from the menu. An alert window will appear; copy the URL in the window. The
process will look like this:
The completed Twitter application form will look something like this:
Agree to the Terms and Conditions, then click “Create Your Twitter Application.”
5. Copy your app tokens to the spreadsheet
There are two “tokens” or “keys” that we need from the Twitter application. These are essentially two randomly generated strings that uniquely identify your application. They’re needed for your bot to function. (Because these keys identify your application, don’t share them with anyone!) You can get these keys by going to the application whose keys you want in the Twitter Application management interface. (If you just completed the step above, you’ll already be in the right place.)
Select the “Keys and Access Tokens” tab. You’ll see something that looks like this:
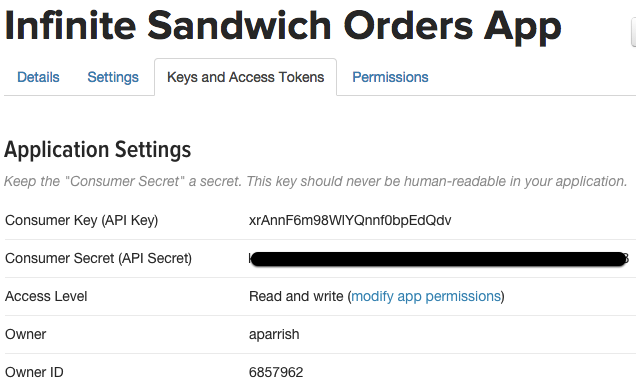
The two strings you’re after are the “Consumer Key” and the “Consumer Secret.” I’ve blacked out the “Consumer Secret” in the illustration above (don’t share these values with anyone, remember?), but my consumer secret looks a lot like yours: a seemingly random string of letters and numbers.
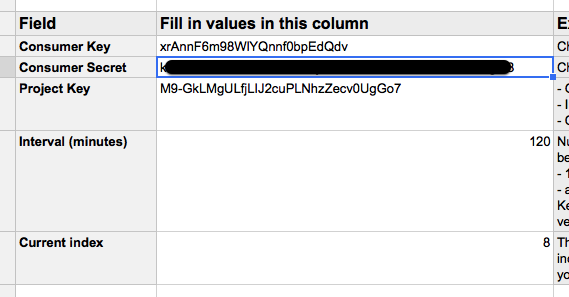
Copy the value for “Consumer Key.” Switch to a browser window with your bot’s spreadsheet open and paste the value into the field labelled “Consumer Key.” Do the same thing for “Consumer Secret.” It’s very important that you copy these values exactly, without any missing or extra characters. Your spreadsheet should now look like this (again, I’ve blacked out my consumer secret):
Great work! We’re almost there.
5. Create a new Twitter account for your bot
Now you need to create a new Twitter account for your bot. The tweets in your bot spreadsheet will be sent as this user. Sign out of your personal Twitter account and then create a new account. Note that your new Twitter account must have a unique e-mail address, so you may not be able to use the same e-mail address for your Twitter bot account as the one you use for your personal account. Try the tricks here to re-use one Gmail account for multiple Twitter accounts, or just sign up for a new free e-mail account with a different service.
(Note: you don’t have to go through the whole “follow these users!” rigamarole.
After you get past the initial account creation step, just enter
https://twitter.com/ into your browser’s location bar. I won’t tell Twitter
that we’ve figured this out if you won’t.)
Important: For the next step (the “Authorization” steps), stay logged into Twitter as your bot account. If you go through the “authorization” step logged in to your personal Twitter account, the tweets will be sent from YOUR account instead of your bot’s, which is probably not what you want!
6. Authorize your bot
Now we need to “authorize” your bot account to use your Twitter application.
To do this, select Bot > Authorize from the menu. You’ll see a dialog box
appear; it will display a URL. Copy this URL and open it in a new browser
window. When it asks you to authorize the application, click “Authorize app.”
The entire process will look like this:
Close the window that says “Success!” and go back to your spreadsheet.
If you have any problems along the way, try the following:
- In your bot’s Twitter settings, go to “Apps” and revoke authorization for your application. Then perform the steps above again.
- In your spreadsheet, go to
Bot > Clear Authand then repeat the steps above.
7. Send a test tweet
Now the spreadsheet should be able to send tweets! To test this out, go to Bot >Send test tweet. If everything is going well, nothing will happen in your
spreadsheet… but if you look at your bot’s Twitter account, a tweet should
appear!
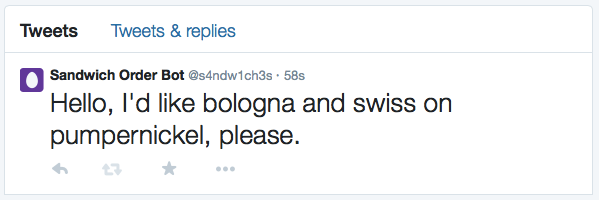
(Did I spell “pumpernickel” right? I don’t even know and I’m too high on bots to bother looking it up! What a time to be alive.)
If the test tweet did not appear, then something went wrong. Click on Tools > Script Editor... and then View > Logs for some hints about what went wrong.
Ensure that you got the values for the Project Key, Consumer Key and Consumer
Secret exactly right. Also: try using Bot > Clear Auth and then repeating the
authorization step.
7. Schedule tweets
The “Interval (minutes)” value in the “Setup” sheet controls how often your bot will tweet. The value for this field must be one of the following:
- 1, 5, 10, 15, or 30
- Or a multiple of 60 (60, 128, 180, etc.)
I recommend setting this to 1 at first, just to check to see if your bot is
working properly, and then backing off to something more reasonable (like
120).
To start your bot’s automated tweeting process, go to Bot > Start tweeting.
You should start seeing tweets showing up in your bot’s account after some
amount of time has passed.
Conclusion and further reading
And… that’s all there is to it! You are officially a botmaker. Please contact me if you have problems or questions.
You can also peruse these other botmaking resources, many of which inspired the approach I took in this tutorial:
- Zach Whalen’s Using Google Spreadsheets for a generated text Twitter bot
- Amit Agarwal’s Dear Assistant
- Harry Giles: How I Made Two Wee Twitterbots
- Patrick Rodriguez: Making Twitterbots with Google Apps Script and part 2
- If you’re more programmatically-inclined, there are several bot frameworks worth checking out, including thricedotted’s twitterbot (for Python) and this node.js framework.